Showing posts with label Small Quilted Projects. Show all posts

Wednesday, September 16, 2020

It's in the Bag - Island Batik Blog Hop


Welcome to my day of the hop! For this blog hop, Island Batik Ambassadors are showing off new Island Batik fabrics lines hitting shops now or heading that way super quick and to show them off this month were were challenged to make bags! And not just any bags. Bags by byAnnie.


I got to choose the bag pattern I wanted to make and Annie graciously sent all the items needed to make it. I was super excited for this project.

I chose the Divide and Conquer pattern because I was really wanted to make those mesh pockets on the inside and also thought it would be fun to have a cool quilted over night bag.


To make the bag, I was sent three fabrics from the Mandala Magic collection by Jackie Kunkel of Canton Village Quilt Works. Check out all the prints in this line, each one is fabulous! 


This pattern comes with an add on video, which I highly recommend watching. It helps oodles when trying to make this bag. Particularly on nights when your tired and the words on the pattern start to blur. The videos are your new best friends.


When I first picked the pattern I didn't think about all the work that would go into this bag. Later when I watched the ad on videos and saw all the steps and tough parts, I thought, "What did I get myself into!" But in the video at one point Annie tells you to take a break if you need to and to take it slow. Best advice ever, specially for those tough binding sections.


At some points I thought this bag would conquer me, but I came out victorious and it was worth it. I do have some boo boos in this but they will stay. My major boo boo happened when I started putting the bag together. After I made all the pieces for the bag I was so excited to sew the bag pieces together, that I didn't realize I sewed the mesh pocket on the back side of one of the vinyl pockets, so the zipper is on the inside of the pocket.... ugh.


While I was making it, I didn't think anything of it because I could open and close the zipper the whole time, that is until I put the front panel on and then I realized what I had one....oh boy, I wasn't about to take all that out. I can still open the zipper though so I am good.


The saying measure twice, cut once should go along with double check your layout twice before sewing. Haha! Even with my boonked up zipper placement the bag still looks fantastic and I have a one of a kind over night bag.


I used a nice peach Aurifil thread and a nice bright purple to put all this together with.


And of course a schmetz needle. I only broke one needle during this whole project, and it wasn't even when I was sewing through all the layers. By a fluke I hit the teeth on the vinyl zipper in just the right spot and snap, the needed was a goner. My machine and needle handled everything else super nice. It even went through all the layers of everything no problem. Of course, I did go super slow as suggested in the videos.


Check out all the patterns at byAnnie, and her supplies. I really liked using the zippers by the yard. They were fun and easy to work with. 


Go visit Connie today too to see her Mandala Magic bag.


You can also check out all the other bags being made for the hop by stopping by the Island Batik Blog. Also this week Island Batik is giving a chance for someone to win their lovely Island Batik fabrics. Use the Rafflecopter to enter. If the Rafflecopeter is not working on my site, you can enter on the Island Batik Blog site as well. It is the same Rafflecopter.


a Rafflecopter giveaway


Happy Sewing!


=^..^=

Tuesday, May 12, 2020

The Ultimate Home Decor Blog Hop


Welcome to Week 2 Day 2 of the Ultimate Home Decor Blog Hop by Island Batik. 


I was sent a lovely bundle of River Valley designed for Deb Tucker’s Studio 180 Design by Kathy Engle.  It should be hitting shops this month.  Island Batik was very generous to send so much for small home decor projects. That means there is some left over to share, but I'll talk more about that near the end. :)


First up I want to show off these two pillows.  I love the look of Cathedral Windows quilts and knew this was a good way to show off these fabrics. There are lots of tutorials on line about how to make these types if Cathedral Windows and one of my favorites is from Diary of a Quilt Maven called Faux Cathedral Windows Pincushion Tutorial.  The tutorial is for a small pincushion, but it is the same concept if you want to go a little bigger. I like her tutorial because it shows how to use tiny dots of basting glue to hold your white folded triangles down.  It works so well I  skip her step 5 where she says to sew all around the edges of each covered square.  Instead I let the glue do its work and start sewing squares together.


Other than the outer border and the back, the whole project is made from 2.5 inch squares.  My pillow is 6 x 6 squares. For each square I needed two white squares folded in half on the diagonal.  I used the foundation by Island Batik called Whip Cream for this.   I have 36 River Valley blues hiding underneath those 72 white triangles.


Next I laid out all the greens on top.  I glue basted these down as well.  It made it so much easier to roll back the bias edge of the white and machine stitch them down. 
I used Roxanne's Glue Baste It.  It's my favorite.  It dries quick and doesn't bother the needle when sewing.


Since I used the blue squares underneath, when I roll back the white, all the blues peak out.


Here is the back side before I trimmed off the greens and added the back side of the pillow.  I pressed all my seams open.

I got to wondering what the pillow would look like with the green underneath and the blue on top, so I decided why not make another one and see.


These are the blues glued down ready for the green to peak out.


I added a 1 inch border around the block so it would fit perfect around a 14 inch Pillow form.
Here they are, almost twins but not quite.


For my mini quilt scene,  The name River Valley and all the blues and greens in this line had me thinking about birds on the river.
Early this year I bought a 4in x 9in Table Top Tri-Stand from Calla Lilly Quilts in Greensboro, NC.  They had a cute display with several patterns for every season from Quiltricks.com that fit perfect  in the frame.  I went to the Quiltricks website to find a bird pattern for the frame, but they didn't have one yet,  so I drew up my own.


A white bird with green feathers enjoying the river water among the cat tails.


I drew all the shapes and then copied then onto some HeatNBond, pressed that on the fabric, and cut out each shape easily.  Some of the pieces are thin so I couldn't really do a satin stitch around each piece, so I sewed a straight line around them using several different colors of Aurfil Thread for a raw applique.  The only pieces that are not part of the River Valley line are the orange I cut from some other Island Batik scraps and the cat tails.  They cat tails came from leftovers from the Cascadia line.  Doesn't' that brown with blue strips go perfect!

These little mini quilts are the perfect size to use up scrap batting. 
I used Hobbs Natural cotton batting leftover from my Lily Patch Pads quilt.

Now it is time to talk about sharing. 

I have two giveaways to tell you about today.  First, Island Batik is giving away TWO Fat Quarter River Valley Packs,
You can enter on their blog or use the Rafflecopter below.  


Second, I am made two charm packs from the leftovers and am giving them away to one of my followers on Instagram. 
Check me out on Instagram on @quilteddelights and look for this photo below to enter.


And be sure to visit  Sandra Walker  to see what she made with River Valley.


=^..^=


Wednesday, July 24, 2019

Artsy Fartsy Island Batik Ambassador Challenge


The July challenge for Island Batik Ambassadors is titled Artsy Fartsy and we were challenged to use three different weights of Aurifil thread to create a fabric work of art.


This was a fun challenge that focused on the threads first instead of the fabric.  It is like buying a cool pair of shoes and then searching for the perfect outfit to go with them.


I was sent some dark purple and peach Aurifil thread in my first Ambassador box and then I received a light purple and an orange a little later.  I must say it was a struggle to come up with something that coordinated with these thread colors.


My mind eventually drifted to a sunset scene, with purples and oranges and I added a spool of Yellow Aurifil thread from my stash to finish off the colorway.


For the fabric I went to the stash builder rolls we were sent at the beginning of the year.  These are fantastic.  I love all the different colors that come in them.  I used up several more of the pieces from these rolls to make my skinny strips and I threw in some left over scraps from the other projects.


I wanted the piece to be mostly purple, to go with the purple threads, so I opted for purple water, sky, and clouds. Check out those 1/4 inch strips!  I tried adding red, but I liked the pinks a lot better for this one so I stayed with that.


I really wanted to use the peach and orange thread I was sent in the center of the sun, but the thread was a heavier weight, 12 weight, and was a little too thick for the look I was going for.  I wanted the rays to have more of a halo look. I will have to save that nice thick peach and orange for another project.

On a side note. I did try the orange in a small section and had trouble with it in my machine at first. So I went to the Aurifil website and they tell you what size needle is recommended and even what size thread is reccomended in the bobbin for each thread weight. It helped me out when trying to get the heavier weight thread to place nice together.


I ended up using:
  • 40 weight in light purple for the wisps in the sky and the reflection in the water. I used every last bit of that spool thread. That is why it is now just a green spool.
  • 50 weight yellow was used for the sun rays.
  • 28 weight dark purple for the water and inside the clouds.


I quilted it using Hobbs Theramore Batting and it quilted up beautifully.


The final peice measures approximately 22 x 30 and my smallest strips finished up a 1/4 inch. My largest strip finished at 1 inch.


Make sure you take some time to visit the other Island Batik Ambassadors to see their Arsty Fartsy projects. Most have posted for July already and there are still more to come before the month ends.

Carolina Asmussen ~Carolina Asmussen
Gene Black ~ Gene Black
Pamela Boatright ~ PamelaQuilts
Connie K Campbell ~ Freemotion by the River
Anja Clyke ~ Anja Quilts
Becca Fenstermaker ~Pretty Piney
Jennifer Fulton ~ Inquiring Quilter
Barbara Gaddy ~ Bejeweled Quilts by Barb
Dione Gardner-Stephen ~ Clever Chameleon
Sarah Goer ~ Sarah Goer Quilts
Vasudha Govindan ~ Storied Quilts
Lori Haase ~ Dakota City Quilter II
Joanne Hart ~ Unicornharts
Mania (Magdalini) Hatziioannidi ~ Mania for Quilts
Carla Henton ~ Creatin’ in the Sticks
Stephanie Jacobson ~ Steph Jacobson Designs
Connie Kauffman ~ Kauffman Designs
Joan Kawano ~ Moosestash Quilting
Kim Lapacek ~ Persimon Dreams
Emily Leachman ~ The Darling Dogwood
Leanne Parsons ~ Devoted Quilter
Bea Lee ~ BeaQuilter
Toby Lischko ~ Gateway Quilts & Stuff
Bill Locke ~ Studio Bill Locke
Denise Looney ~ For the Love of Geese
Leah Malasky ~ Quilted Delights
Sally Manke ~ Sally Manke
Maryellen McAuliffe ~ Mary Mack’s Blog
Kathleen McCormick ~ Kathleen McMusing
Carol Moellers ~ Carol Moellers Designs
Karen Neary ~ Sew Karen-ly Created
Jackie O’Brien ~ If These Threads Could Talk
Laura Piland ~ Slice of Pi Quilts
Michelle Roberts ~ Creative Blonde
Vicki Schlimmer ~ Vicki’s Crafts and Quilting
Gail Sheppard ~ Quilting Gail
Sherry Shish ~ Powered by Quilting
Anita Skjellanger ~ Quilt in a not-Shell
Laticia “Tish” Stemple ~ Tish’s Adventures in Wonderland
Jennifer Strauser ~ Dizzy Quilter
Jennifer Thomas ~ Curlicue Creations
Terri Vanden Bosch ~ Lizard Creek Quilts
Alison Vermilya ~ Little Bunny Quilts
Sandra Walker ~ mmm! quilts
(Debora) Anne Wiens ~ Seams like a Plan
Geraldine Wilkins ~ Living Water Quilter
Janet Yamamoto ~ Whispers of Yore


=^..^=


Sunday, November 8, 2015

My Schnitzel & Boo Mini Quilt - Round Four

I decided to enter the world of swapping again.  This time it is mini quilts and all of the activity was on Instagram.  It was a new way to be a part of a swap, but since I love Instagram it was super easy to follow along.  My updates were all done on my quilting Instagram account: quilteddelights, but I want to post them here too.  So this post will be my mini quilt from start to finish.

I was going to make a mini New York Beauty quilt, but I didn't enjoy trying to sew one inch curved seams.  So I chucked all my paper pieces in the trash along with fabric from my first attempted block.  No pictures of that mishap, but it was a relief to trash it and move on to a more feasible and enjoyable project.

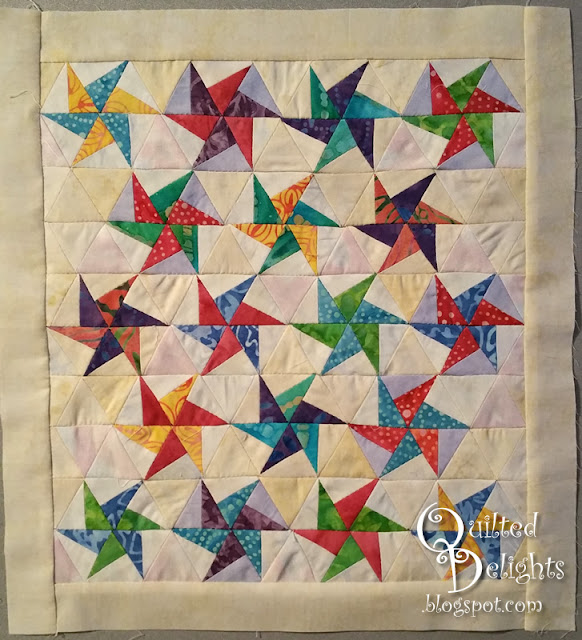
I really enjoyed making the Schnibbles Hook pattern last year and wanted to see how it would look in a tiny version.


I love my wonder clips. They helped keep all my hexagons in order.

The mini quilt went together pretty quick.


 All the fabric came from my batik scrap bin.  
Even the background fabrics came from the scrap bin.


It will be landing in its new home this week. 


Size is 11.5 x 12.5 inches.

I hope its new owner loves it as much as me.


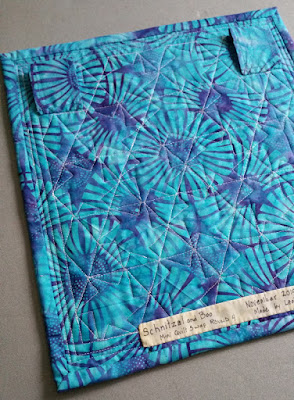
This is the mini I received in return.  It was fabulous.  I really was worried about joining the swap world again, but after receiving such a lovely quilt I decided to keep swapping and joined a few more mini swaps on Instagram!


=^..^=

Wednesday, December 31, 2014

End of the year Wrap Up

Wow, a whole month has gone by with no blog posts.  The month of December had very little time at the computer, which is a rare thing for me.  I did get a little sewing done but not as much as I would have liked. I haven't even completed any goals on my Fourth Quarter Finish-A-Long list.  I was so busy with work and vacation and holiday stuff that I didn't even get a chance to blog or have time to to take fancy photos.  Instead I have some late night cell phone pics, not the best, but still better than no photos at all.

So this post will be a December Recap and a 2014 recap. 
Before we left on vacation, I finished up a few sewing projects.  

First up is the first of two T-shirt quilts for a client.   (I'm finishing up the second one this week)

This is a small quilt using only four shirts. The backs of the t-shirts had some words printed on the back as well so I added them in the quilt.

Next up are the items I made for the "Twas the Night" blog hop:
a foldable needle holder, some small snap bags, crochet dish scrubbers, and a cute little Christmas bag to put wrap them all. These all went to Jane for the blog hop. She posted them on her blog during the hop, but I wanted to post them here as well.


I also made a few more snap bags as Christmas presents for some special friends of mine. 


Then it was time to hit the high seas.  We took another cruise this year for our family Christmas present and had a wonderful time.  We went to Jamaica, Grand Turk, and Nassau.  
We got back in time to spend the holidays with extended family and before I knew it December was coming to a close.


Even though the last quarter of the year was slower behind the machine than usual, I was very productive for the rest of the year.  Here is my collage of Finished Quilts for 2014.


Next up is my collage of the Smaller Projects I completed in 2014.

I'd say the year as a whole was a pretty good one at the machine.


=^..^=